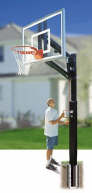
| Installation Tips For Your Basketball System |
Do It Yourself Installation Tips
Bison Basketball Systems are easy to install. Bison provides clear, easy to read
installation instructions complete with illustrations with every system. Then we have
taken it a step further to make it even easier with our do it yourself installation
tips. We have installed well over 3000 Bison systems in the Puget Sound area over the
years and have developed some great time saving tips that we are happy to share with
you. We will even fax you the installation instructions before your system
arrives so you can get a head start (once you have made your purchase email us with
your name and model number and we will get it out right away) NOTE: not all tips
apply to all systems.
TIP #1: DIGGING THE HOLE
Most Bison systems require a 8"-10" x 30" hole for the pole. Use a post hole digger
and a digging bar to do this job. With these tools you should be
able to dig the hole in 15 to 20 minutes, even in tough digging conditions. If you
don't have these two simple tools borrow them from a neighbor or rent them for a few
bucks each at your local tool rental store, it makes all the difference.
TIP #2: CEMENTING THE POLE
Most Bison systems require only about 4-6, 60# bags of concrete at about $2 to $3 a
bag that you can buy at any hardware store, no big deal. You can even haul it in the
trunk of your car. If you don't have a wheel barrel to mix the cement in, do it a bag
at a time in a five gallon bucket, works just fine. You don't need an elaborate brace
system to hold the pole while its drying, gravity works just fine. Just check it a
few times with the level during the first hour then don't touch it for about 12
hours. Wait at least two days before installing the rest of the system.
TIP #3: INSTALLING THE QWIK-CHANGE EXTENSION ARM
Pre-assemble the arm on the ground before installing on the pole. Clamp a small piece
of 2x2 or 2x4 to the pole at the height where the extension arm mounts. This will help support the arm while you attach the arm clamps and will help
keep the pole from getting scratched.
TIP #4: INSTALLING THE ZIP-CRANK EXTENSION ARM
Install this arm on the pole in sections in the following order. First install the
crank mechanism brackets to the back plate and the top extension arm on the ground.
Attach the back plate to the pole at the required height, then the top arm, then the
crank, then the bottom arm and finally the front bracket.
TIP #5: INSTALLING HEAVY BACKBOARDS ON FIXED HEIGHT SYSTEMS
Rent a hand-crank lift from your local tool rental store for this job. The lift can
be rented for about $35 and takes all the worry out of the job. With the lift even
one person can install a full-size glass backboard on a fixed height pole. Sure beats
4 guys trying to lift a 300# backboard 10' in the air on ladders.
Court Layout Diagram
Important measurements:
| Free Throw Line |
15' from face the of the backboard |
| High School 3 Point Line |
19'9" from the center of the rim |
| College 3 Point Line |
19'9" from the center of the rim |
| Pro 3 Point Line |
23'9" from the center of the rim |
| Regulation Rim Height |
10' from the top of the rim |
| Regulation Court Size |
50' x 94' |
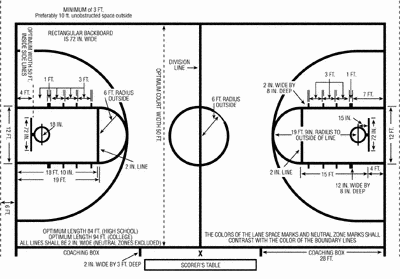
|